

 Here is what I did.
Step 1: I found some pre-made ruffle trim at the fabric store that perfectly matched my cardigan. I got about 1 1/2 yards but I didn't use it all. And obviously, you could use a contrasting color just as easily.
 Step 2: I folded the raw edge under and then folded it under again. Then, using a needle and thread, stitched the folds shut, basically sandwiching the raw edges inside. I figure this will prevent it from running if I need to wash it.
 So, this is what it looked like at the end of this step:
 Step 3: Put the ribbon/ruffles face down just below the shoulder seam. Using a needle and thread, tack the ribbon to the shoulder seam, just above the seam you just made in step 2. That way, when you fold the ribbon/ruffles back down, that seam you made in step 2 will be hidden underneath.
 Step 4: Using a needle and thread, tack the ribbon/ruffles to the front of the cardigan every inch or so. Line up the edge of the ribbon to the cardigan's neck line for about 1 1/2 inches, then bring the ribbon out toward the sleeve in an arc, so it ends up looking like a half circle. Make sure the arc ends up at the corner where the neckline meets the front buttons. Leaving yourself a little bit extra, so you can make a seam like in step 2, cut the excess off. Make the seam in step 2 on the new cut-off end, and then tack that seam to the edge of the center of the cardigan. It doesan't matter what it looks like, because you'll be covering it up.
 Step 5: Make another seam as in step 2 to the rest of your ribbon/ruffles. Lay the ribbon face down on top of the seam you just tacked on in step 4. Sew the ribbon to the cardigan just above the seam you just made, so all these seams are hidden beneath the ribbon once you flip it over.
 Step 2: I folded the raw edge under and then folded it under again. Then, using a needle and thread, stitched the folds shut, basically sandwiching the raw edges inside. I figure this will prevent it from running if I need to wash it.
 So, this is what it looked like at the end of this step:
 Step 3: Put the ribbon/ruffles face down just below the shoulder seam. Using a needle and thread, tack the ribbon to the shoulder seam, just above the seam you just made in step 2. That way, when you fold the ribbon/ruffles back down, that seam you made in step 2 will be hidden underneath.
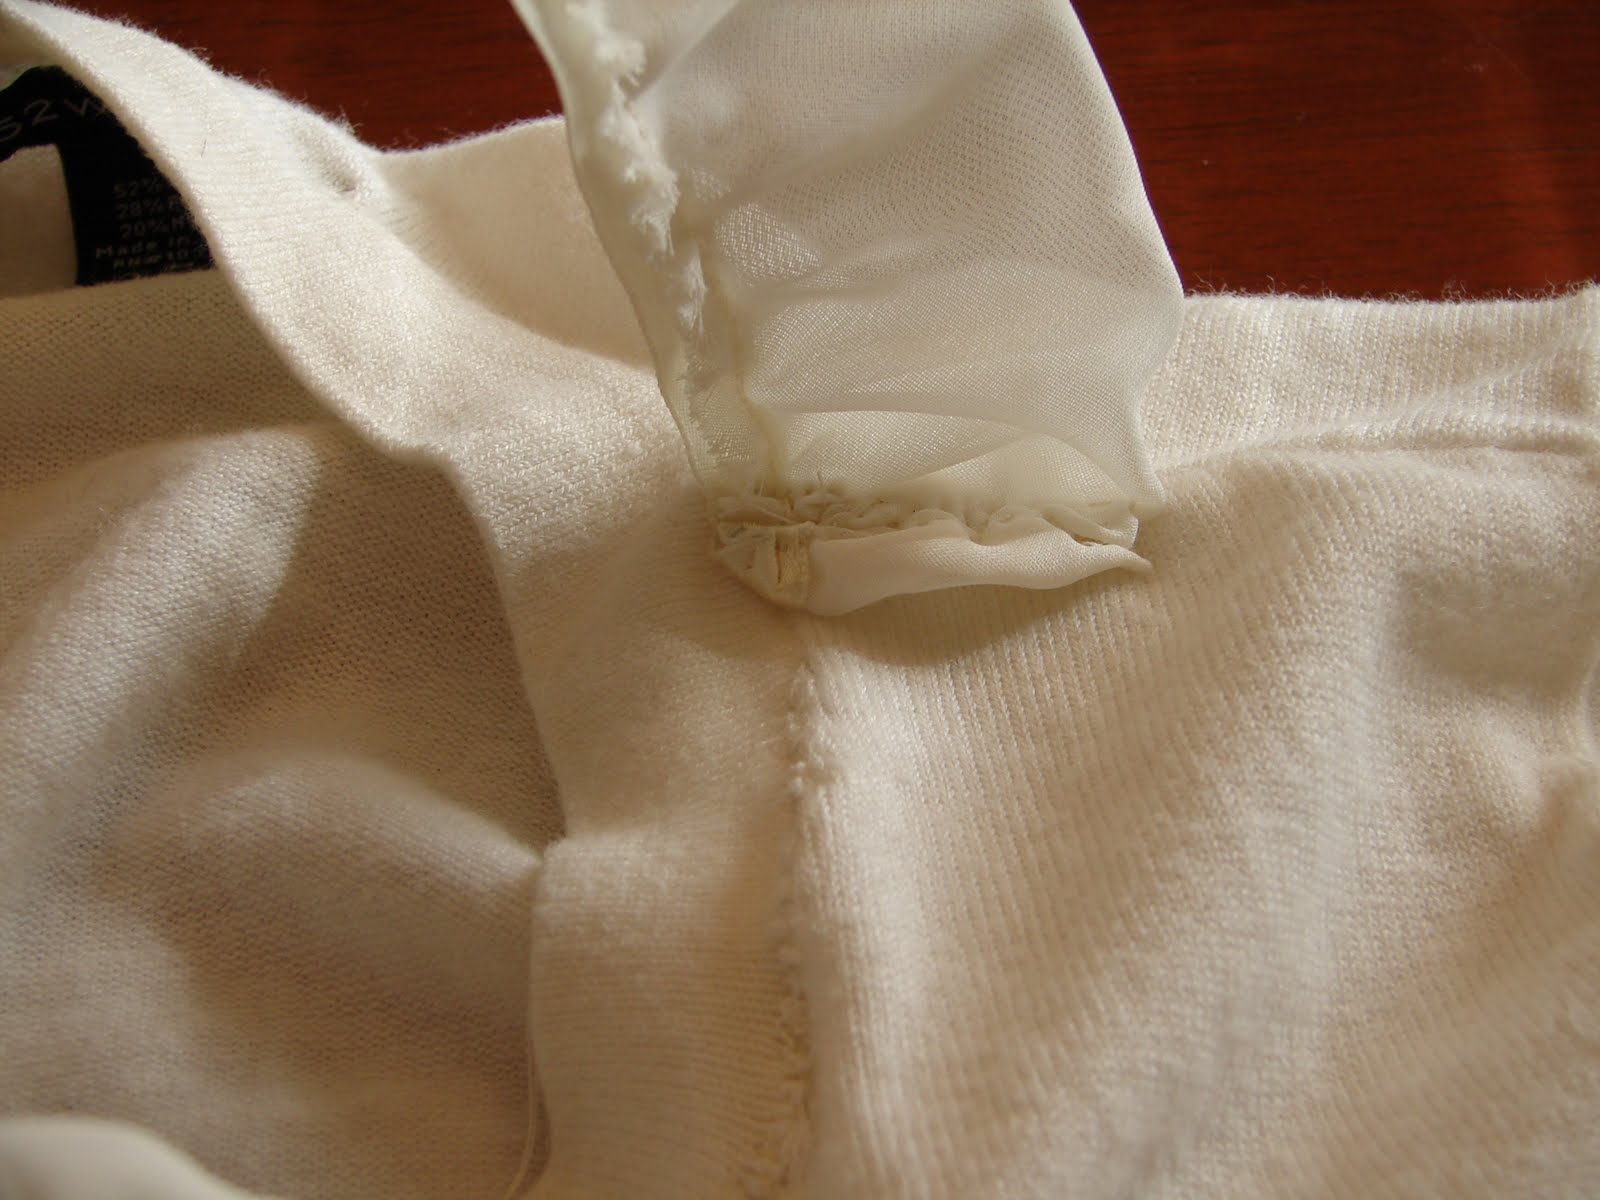 Step 4: Using a needle and thread, tack the ribbon/ruffles to the front of the cardigan every inch or so. Line up the edge of the ribbon to the cardigan's neck line for about 1 1/2 inches, then bring the ribbon out toward the sleeve in an arc, so it ends up looking like a half circle. Make sure the arc ends up at the corner where the neckline meets the front buttons. Leaving yourself a little bit extra, so you can make a seam like in step 2, cut the excess off. Make the seam in step 2 on the new cut-off end, and then tack that seam to the edge of the center of the cardigan. It doesan't matter what it looks like, because you'll be covering it up.
 Step 5: Make another seam as in step 2 to the rest of your ribbon/ruffles. Lay the ribbon face down on top of the seam you just tacked on in step 4. Sew the ribbon to the cardigan just above the seam you just made, so all these seams are hidden beneath the ribbon once you flip it over.
Step 6: Tack the ribbon every inch or so about 1/2 an inch above the arc of the layer below, so you can see the ruffles stick out beneath the layer you're now taking on. Instead of just completing a half circle, tack the ribbon all the way around this time.
 Step 7: Once you've made a circle, continue tacking it down in a spiral pattern, until you have barely any room left to tack. :)

 Step 8: Take the end of the ribbon/ruffles and stuff it inbetween the spots where you tacked it town until you've got the unfinished end of the ribbon underneath the bottom layer of the rosette you've made.
 Step 9: Play with it until you've created a pretty center for your rosette, then tack it down anywhere you feel you need to in order to cover up the ends or stitches you've made, etc.
 Step 10: Cut off the excess ribbon, leaving a little extra to repeat step 2 again and seal off the ends for the last time. Then, tack the end seam down underneath the bottom layer of ruffles, so it's hidden underneath.
 TaDa!
TaDa!
 You've got a pretty little cardi with a pretty little rosette on it.
 Obviously, if this were not a cropped cardigan, I could have done a few more layers underneath to make it hang lower, like the Jcrew one does, but I felt like that would be a little much for this mini-size cardigan of mine. Maybe I'll have to try it again and do that with a full-size cardi. :) Also, I realize it would be faster and easier to do this by just using a sewing machine, but I was worried about the cardigan being able to stretch, as that is where the hole came in the first place. Anyway, have fun! :)
 Step 7: Once you've made a circle, continue tacking it down in a spiral pattern, until you have barely any room left to tack. :)Step 8: Take the end of the ribbon/ruffles and stuff it inbetween the spots where you tacked it town until you've got the unfinished end of the ribbon underneath the bottom layer of the rosette you've made.
 Step 9: Play with it until you've created a pretty center for your rosette, then tack it down anywhere you feel you need to in order to cover up the ends or stitches you've made, etc.
 Step 10: Cut off the excess ribbon, leaving a little extra to repeat step 2 again and seal off the ends for the last time. Then, tack the end seam down underneath the bottom layer of ruffles, so it's hidden underneath.
 TaDa!You've got a pretty little cardi with a pretty little rosette on it.Obviously, if this were not a cropped cardigan, I could have done a few more layers underneath to make it hang lower, like the Jcrew one does, but I felt like that would be a little much for this mini-size cardigan of mine. Maybe I'll have to try it again and do that with a full-size cardi. :) Also, I realize it would be faster and easier to do this by just using a sewing machine, but I was worried about the cardigan being able to stretch, as that is where the hole came in the first place. Anyway, have fun! :)
No comments:
Post a Comment